When I attend any antique wooden
boat show, the first thing my eye catches are those beautiful fine finishes
on those truly classic hulls. There is something about the look of a well
designed antique wooden hull, glistening on the water, with it's chrome
or polished brass parts accenting their sculptured-like lines that strikes,
I believe, all of us. The combination of natural wood and man-made
polished metal, to me is a very eye appealing experience. This article
is written expressing my thoughts on the execution of the time honored,
typical spar varnish finishing method used to achieve the deep warmth and
beauty of those varnished wood boats. And some thoughts on one other possibility
of finishing a classic wooden boat.
definitions
& a few thoughts
First of all. Marine coatings for wood
- a clarification. "Varnish" today is a generic name used by coating suppliers.
Many years ago, varnish was produced predominantly by boiling linseed oil.
In the last couple of decades, coating suppliers replaced real varnish
with a solvent-based (and recently water-based), polyurethane-based material.
This was done because polyurethane has overall, superior physical properties
than the former "boiled linseed-based varnish". These 2 coatings are a
completely different 'breed' from one another. Polyurethane is a petroleum-based
derivative product. But the name "varnish" and "spar varnish" seems to
have stuck with these marine coatings. I suspect marketing folks must of
thought that the name "varnish" was a product that had established name
recognition. So the chemical name was not used for the general public.
Anyways, this article will detail the application & polishing of a
"varnish" (polyurethane) coating. Which in this case, is a singular-component
(non-catalyzed), linear polyurethane. These polyurethane coatings are very
flexible, quite durable, (some coating companys also claim they are 'hard')
quite the opposite) and adhere well to other types of coatings and to it's
own type. They are relatively easy to apply by brush. But, as with most
coatings for wood, never 'bullet' proof. The wood itself is the weakest
link in this chain. Today, powder coatings & UV (ultraviolet cured)
coatings are superior coatings versus what was typically used for wood.
And because of environmental reasons, they are being use more today than
ever in wood finishing. The harsh conditions of a marine environment has
many problems for these types of coatings. The more traditional coatings
of Lacquers, Enamels and Polyesters are of different "families" of chemical
makeup. They will not be considered for this article. I would not recommend
these types of coatings for marine type finishing on wood. This article
also has a few thoughts on "automotive-type" urethane coatings that can
also be used for wood in a marine environment. The coatings are the plural-component
(2-part, catalyzed), hybrid, acrylic-urethane types. This product is fast
becoming the preferred coating for today's automotive refinisher. I think
they are a viable alternative coating for wood boat restorers who have
access to professional spray & safety equipment.
varnish
(polyurethane) vs automotive-type (urethane) coatings
After completing the varnish coating
on my old hydroplane, I have come to the conclusion that the truth of the
matter is the "automotive-type" coatings can produce a great shine quickly
and can be applied in a lot less time than "varnish". They have had tremendous
gains in their properties within last 5 years. The biggest benefits that
I see are the one-time, one-day, multiple application of coats and ease
of polishing. From an aesthetics point of view, these coatings are quite
clear. So if you want to have that "warm" amber look of varnish, you will
need to introduce a "amber" colored dye into the product to achieve the
look of "varnish". They tend to have a "plastic" look to them. Just a side
note, either of these finishing systems can be applied over epoxy coatings.
And I would recommend surface preparation using this product. It has many
useful properties that I will explain later in this article.
The drawbacks with "automotive-type"
'marine' urethane coatings are that you need to "professionally" apply
this coating. That means spraying and all the precautionary steps that
go along with atomizing a coating with air. Another factor is cost. Transfer
efficiency of the coating product to the surface is poor. At best, about
half of the coating is wasted in the air, due to the inefficiencies of
spraying a coating. Another drawback is total film thickness. They tend
to have much higher 'solid' contents. You can not keep piling on multiple
coats of this product. Some coating mfg's state urethanes can be built
up to about 20 mils (dry) thick, but I would never recommend going this
thick on a wood product. These are 'harder' type coatings versus "varnish"
and will have a greater chance of cold
checking or spider web cracking with the greater movement of wood versus
an alloy or non alloy type surface.
"Varnish" will be applied mostly
with a foam brush, which means close to everything you paid for will end
up on the lumber you are trying to protect. You can recoat very easily
and you can apply many coats. The biggest drawbacks with "varnishing" would
have to be the time length involved in the coating application and polishing.
Because of the physical properties of this product that give you all the
benefits described above, those properties also hinder the wood finisher.
"Varnish" has a very long, dry-to-touch, cure time. And you usually have
to wait 24 hours before recoating. And you need to resand (280 or 320 grit)
before applying the next coat. If temperature and humidity are ideal, you
can cheat and apply another coat over a 'fresh' coat, but you a taking
a chance. And even then, only one coat could possibly be applied. The marine
coatings just do not dry fast enough. Most of these coatings have a "window"
that you can recoat in. And some of these coatings have a narrow time frame.
Follow the mfg's suggestion. Practice on samples. The last thing you want
to do is need to sand a coat off because of an adhesion problem. I've seen
it more than not that when it comes to wood finishing, you will usually
pay dearly in time & money with your attempt to 'cut corners'.
"Automotive" Coatings:
If you are going to apply the automotive-type
coatings, and you sprayed the coating in a clean environment, you will
not have much dirt in the coating. If you do not want to put any more effort
into polishing, you're done. The coating will have a "orange peel" effect....but
it will be shiny...similar to what the Detroit puts out on the new cars.
But if you want a custom look, polishing will be relatively a simple process.
These coatings are 'harder' and polishing-friendly. To get the 'mirror,
wet look, wet sand with 600 grit and then 1200 grit. Followed up by polishing.
"Varnish" Coatings:
"Varnish" has a thin protective
film that is floated to the top as the solvents evaporate from the coating
you just applied. This abrasion resistant film helps the "varnish" prevent
marring and fine scratching. If you decide to polish the coating, you will
remove this protective film and your coating will be more susceptible to
scratches. Also, these "varnishes" are probably the worst coatings in the
world to polish. They are very "soft" coatings, which in turn, make it
difficult to polish. Some "varnish" coatings are nearly impossible to polish.....they
will have a "haze" to them after all your hard work. Remember, these coatings
were not developed to be polished and thus the physical properties of the
coating do not lend themselves favorable to polishing.
SIDE NOTE: For other arguments on
this subject,
click
here to read an article on the Land O'Lakes Chapter of the ACBS website
about this debate. It's titled, "Urethane-- A Viable Alternative to
Varnish?" by Sherwood Heggen. This article explains some of the differences
between using these two coating systems in a marine wood built hull. It
sounds like it is still being proved out, but you will have to decide for
yourself which is the route for your hull.
a
flawless finish
Unless the last coat was applied in
a perfect clean "coating-friendly" environment, you will have dirt, lint,
and other airborne contaminents will float into your wet varnish coating
during application and the relatively long, dry-to-touch cure time. The
washing the floor, perfect time in the day or evening, and the other rules
you hear and read about are never going to totally eliminate surface imperfections
caused by the little dirt and lint buggers. You can minimize the amount,
but you are fooling yourself if you think you will produce a totally flawless
surface effect in a garage or outside. Detroit spent millions researching
'dirt' in their automotive coatings finishing rooms and found most
of those were caused by humans. Lint from clothing being the #1 culprit.
These studies help develop the self-contained, enclosed & dust-free
spray booths. Robotics and deionizing areas for humans entering the finishing
rooms minimized or almost eliminated these little dirt 'buggers'. "Automotive-type"
coatings will be less prone to dirt and lint, because of it's physical
properties, (they don't seem to be have the same "magnetic" properties
as "varnish", but there will be, inevitable some dirt. With "automotive-type"
coatings, those dirt particles can be removed more easily with spot polishing
as opposed to polishing the entire hull. Varnish is nearly impossible
to spot polish.
So be it.....you're not happy with
the final result of your off-the-gun or off-the-brush coating.....
to
polish, or not to polish
That is the question many of you do-it-yourselfer's
ask yourselves after the wood finishing work is completed. Unless you are
coating a flat one-dimensional level surface in a small amount of time,
you will never achieve the correct, micro precision dry film that is required
to produce the reflective effect of a mirror. The reasons why a mirror
is so reflective (and I'm not talking about the silver nitrate that is
applied to back of the piece of glass) is because of a perfect flatness
of the glass itself. The fact that the glass is nearly perfectly flat combined
with the reflective coating on the back combines to reflect light perfectly.
No distortion in the reflectance is the sign of a quality mirror. Telescope
lens take this reflectiveness to the next level. Same principal applies
to any coated product. Most coatings are applied with brush or spray, and
that, combined with solvents that help smooth and flow the coating out
in an attempt to achieve that 'perfect' film level. But you will always
have a "orange peel" texture to the surface and this will distort the reflectivity
of the coating. You can see this by sanding the surface by a blocking the
coating will very fine sandpaper. This will dull the high spots and reveal
the amount of "orange peel" texture that is impairing the final goal of
a perfectly flat, reflective coating. Without sanding and polishing, the
coating's brilliance, shine or reflex can be high.......but to what degree?
There are instruments that measure
this and assign a number on a scale rating. We use them in our shop. The
Gloss Meter instrument reads this by bouncing a light off the surface and
measuring the amount of reflectance. But the difference that can be achieved
between a shiny pebbly and a mirror effect is the refinement of
the reflective surface. Usually, an acrylic enameled or urethane
surface that is sprayed well will score a higher gloss level than a polished
to perfection, glass-like surface. So the machine sees a difference of
gloss but the machine cannot 'see' quality difference. This is the difference
you can see from a factory applied coating and the custom
applied coating. The difference being - the surface imperfections have
been removed by the sanding/polishing process. So when you see a "shiny"
coating out there and you're amazed at the brilliance. LOOK CLOSER. Judge
the coating by it's reflective qualities. Next time you are at a classic
car show, look at yourself in the coatings of different custom paint jobs
from about 3 feet away. Are the details of your face as crisp as when you
look into a mirror or are they slightly distorted by a pebbly effect? If
they crisp and clean like looking into a mirror, then you are not just
viewing just a shiny coating, but instead a very refined work
of art. Years ago, it was rare to see this quality of work on custom
paint jobs, most of them were done with many coats of acrylic lacquer and
polished out to perfection. But today, with the improvements made to automotive
coatings, it's rare to see a car at a show that isn't painted and polished
to perfection or very close.
 |
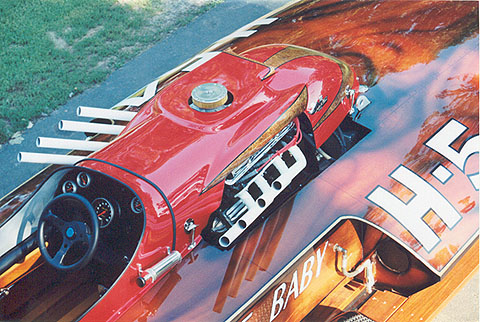
Moonshine Baby H-54 was clear coated
with Z*Spar Flagship #2015 "Varnish".
The graphics were sprayed with white &
black acrylic enamels (2-part) over the top of the Z*Spar after the clearcoat
was cured & polished. |
I
want it as perfect as I can get it
Unless you have tons of more time or
some more money to spend, perfection is a lofty goal to achieve with clear
coat wood coatings. The fact is you are coating a piece of wood and wood
was a living organism composed of a cell structure will always move in
the course of time. Any coating will only be as perfectly refined as the
structure it goes on. Temperature and humidity changes will move almost
any structure a coating is applied too. Even a mirror (the silver nitrate
on the back of the glass and the glass itself) degrades over an extended
time. Wood will continue to have movement, expanding and contracting. The
coatings for wood have more elastomers in the coating recipe than most
other coatings for this. This helps the coating stay pliable during the
surface contractions (a good thing). But this also means that all your
sanding and polishing work will eventually degrade slightly with time.
It will eventually form a "orange peel" texture from this movement. Although,
it will never degrade to the degree of an off-the-gun or off-the-brush
application of a coating. That 'orange peel' texture will eventually get
worse.
so
what gets me close?
A little thought, some extra time, money
and alot of 'elbow grease' will go a long way. If you have never attempted
wood finishing with marine coatings, practice on some samples before starting
on your wood hull. About 95% of your time goes into surface preparation
prior to the coating application and/or polishing. Don't butcher all that
hard work because you think you can wing it along the way. Your
final result will convey this.
before
you start
First......again.....make some samples......Perfect' everything on your
samples before proceeding. I think most folks will be glad they did. It will give you the
satisfaction of knowing what you are going to end up with. It will also
allow you to make changes, especially with the color. With your samples,
you can figure out what sanding steps are required, (and which sanding
steps are NOT required), amount of stain and strength needed, proper amount
of time to leave the stain on before wiping off, diagnose potential problems
with sealers, and topcoats, (and polishing....remember certain "varnishes"
will produce a haze). If you want that look, now is the time to find the
correct "varnish". Peace of mind has it's dividend's. With wood finishing,
it's best to find all the "surprises" on a scrap piece of lumber and not
your prized hull. You can make changes easily with samples. On your sample,
mask off each of the steps you take with masking tape, after you complete
the sample, removal of all the masking tape will give you a "Blueprint"
for your wood finish. Remember.....after it's all done.....you're the one
who is going to have to live with the results.
surface
preparation
Sanding....If you are finishing plywood, look at the thickness of your
top "ply". This top veneer of the plywood, even from the same manufacturer,
can and will VARY. Be sure you have enough "meat" to work with if you are
going to sand with a heavy grit. By the way...a few years back the American
panel manufacturers were going to adopt the European standards for veneer
thickness. Most European & Asian grades of plywood for furniture have
a 1/40" veneer thickness. Americans opted not to go to this standard and
stayed with the 1/28". This is good. It is almost impossible to refinish
(from the sanding that is involved) a Non-American made veneered panel.
Producing quality marine grade plywood was given up being produced by the
American manufacturers. Fortunately although, with marine grade plywood
produced by the Europeans, I've found there is a significant thickness
on the top ply, face veneer, closer to 1/16". They were thinking. But look
first before proceeding.
Sand only enough to get out the surface imperfections. If you have
a scratches and dents, soak a towel with hot water and apply to the scratched
area. This will raise the grain and in most cases lift the surface of the
veneer or lumber so you can sand out the area level. Don't trying sanding
out imperfections without raising the grain, you may sand through the face
veneer, then you will have a real problem. Sand with the grain and
a level block to support the sandpaper if using anything from 35 grit to
280 grit. Use the finest grit possible to remove imperfections. At 320
grit sandpaper, you can usually get away with a DA (dual action, circular)
sander and not show circular marks from the stain that will highlight
the sander scratch pattern. You can use a random orbital sander but I prefer
a non orbiting sander for this step. A straight-line sander is going to
give you the best job, but they are slower. If you are not sure, sand with
a block in the direction of the grain. For final sanding, this will
not take much more time. Change your sandpaper frequently. Sandpaper is
relatively cheap compared to your labor time. Silicon carbide coated on
the paper is best for wood. But the "sharpness" of the silicon carbide
will degrade quickly, so again, keep changing sandpaper for the best, most
even results. Another note - Quality sandpaper is a must. If you have ever compared different mfg brands of sandpaper you will know why. Don't be cheap - you get what you pay for. For the lower
grades (up to 120 grit), there is not much difference between manufacturers,
these are essentially "filing" grades of sandpaper.
Remember, your stain work will only be as consistent and even as your
last couple of sanding operations were.
a
few other notes worth mentioning...
Before you start sanding, "wash" your hands with wood dust. If you have
any oils from your hands on the wood surface, wash the wood area with Naptha.
Also, another "trick" used by wood finishers is to pour Naptha on the entire
wood surface. It will give you a visual look of what the surface will look
like after all the clear coating is done. It will show up everything.
When you happy with your results and think it's time to apply some
stain (or sealing the wood, if not staining), vacuum the dust off, then
use dry, clean, compressed air to blow the wood dust from
the wood pores. If you use a tack rag, wipe very gently. That's a shellac-type
of product they impregnated into that cheesecloth that makes them tacky
and this product will show up if any gets on the wood surface when stained
or varnished over.
applying
the wood stain...
SAFETY First. With most stains, you're dealing with flammable solvents.
Protect yourself, your hard work, and your prized possessions. Make sure
environmental conditions are right. Next make sure it is warm and
dry out. After you have practiced on your samples and think you are ready
to color that wood.......remember....this is not a race. One of the reasons
it is hard to get anybody interested in wood finishing is because it's
very dirty work. Most people just want to get it over with. So take your
time and be very methodological towards this operation. Try to apply the
stain inside or at least in the shade. Lighting is critical. Have lots
of it. Many a bad finishes were due to poor lighting. Also...view your
work from different angles to 'see' it all. You probably don't want to
see any surprises when you're done and take it outside in the bright sunlight.
The staining application operation will work the best with 2 people
when staining a very large object such as a boat hull. One to apply &
one to wipe off the excess. If working by yourself, map out your strategy.
I stained my hull's bottom first, followed by the sides, chines, and sponsons.
Using all natural breaks in the hull to your advantage. After all finishing/topcoating/
rubbing is completed, then flip the hull, mask off all your finished work
and then finish the decking.
From your samples you will already have figured out a time to let the
stain sit before the wiping off operation. Make sure your stick to your
schedule. Generally, wood will only absorb so much stain. But stain formulations
vary, so follow your own time schedule. Apply the stain in a circular,
downward movement, making sure you are getting it's pigments loaded into
the pores really well. If you did larger samples you will have figured
out that. Stain wiped off too early? The stain may not give you an even
coloration of the pores and may look spotty. Some stains, if left on too
long, can darken the wood past where you wanted it. If this happens,
you can lightly steel wool or scotchbrite off some excess, but be careful.
This effect can look different than what you are trying for. Most wiping
stains are formulated for a "clean wipe". All excess stain is removed.
Make sure you have many absorbent, lint free rags available.
The stain is going to bring out all imperfections. If you missed a
scratch or dent, sand it out now, yes....during the staining operation,
if you wait until after the stain has dried, and then try to fix and restain
the area, you will have a "halo" around that repaired area.
When you done, stand back and thoroughly go around your hull looking
for areas that don't look right. A even application, followed by a clean,
even wipe will give you the results that you achieved with your samples.
Most wipe stains require an overnight cure. Follow this direction.
If you start applying your clear coats before a complete cure of the wiping
stain you will probably have adhesion failure.
One Very Important Note: Wet all your rags down with
water if you used a solvent-based stain when you are done staining. The
oils used in these stains can, and will, self combust if compacted enough
and not given enough air to dry. I've seen many fires in the finish room,
because of this. I am always surprised this is not even written on some
brands, or the ones that are supplying this information, written larger
on solvent based stains that are sold to the public.
sealing
the wood prior to topcoating
First....you need to seal the wood and allow gases that are in the pores
of the wood to escape. Mahogany and Oak are two wood species that have
deep pores and need to gas out as the first coat begins to cure. Species
like maple and cherry do not have pores that are very deep and are not
as prone to this phenomenon. What is happening here, is the sealer coat
is "forming" a skin on the top surface and the gases have not all escaped
from the wood surface. As the gas tries to escape, tiny bubbles will appear
in the first coating. These are commonly known as blisters. You
DO NOT want these, as they are nearly impossible to remove without starting
all over. Even a no-stain finish can show these. Do not start piling coatings
on the surface thinking these will disappear. You will only make them worst.
Sand off and restart. If you prepared you samples first, you would have
seen this and prepared your sealer accordingly.
Secondly....humidity level....if it is humid out, you will get water
trapped in your clear coat as it dries. Do yourself a huge favor and wait
for another day. Moisture trapped in the coating will look like a white
haze or a bloom. Another mistake that requires a full stripping and sanding.
If you have some "blooming" after the clear coat has cured to touch, you
can heat up vegetable oil and pad the surface. This will resoften the coating
and allow the moisture that is trapped to escape on certain coatings. Another old trick that
still works with even today's hi-tech coatings. (I remember my mom crying
after she ironed a shirt on top of some towels on her new coffee table.
I cooked up some hot, not boiling, oil and showed her how to fix this dilema.
This also works for water spots on your furniture). After any clear coating,
move the object indoors or put up a tarp. The nighttime dew sitting on
any freshly clear coated surface, even after 16 hours, may "bloom" the
coating.
sealing
the wood with epoxy prior to topcoating
The sealing step is where I like the epoxy coatings. You may use this product
under either clear coating system you are electing to use. With a stained
hull, the best property of epoxy is two-fold. The first being, it can go
on most open pored woods, full strength, with out 'blistering'.
Just make sure you apply a very thin film for the very first couple of
coats. No excessive rolling or brushing here, you might want to use foam
brushes for the first few coats.
Secondly, epoxy has very high build, and you can apply multiple coats
after the product has reached a dry to touch state. I started in the early
morning and applied as many coats of epoxy as I could before the work day
was up. After a 24 hour cure, you will have a encapsulated finish, with
the chances of sanding through this finish very remote. You still want
to be cautious around edges and corners when sanding, but for the most
part, you have just "locked in" all your staining and woodwork with a very
thick, hard, and durable film. If you have ever sanded through the stained
finish, you'll appreciate this property.
topcoating
After preparing the coating for topcoating
by sanding, vacuum and tack off the dust. If applying "varnish", I pour
out a line and using a wide foam brush, work left to right out from any
end. I worked out about 2 feet and started the next row. As I near a wet
surface I lightly overlap the previous coating. Add solvent, (as, and/or
if), required to get a level and even flow out. Work quickly and try to
get a heavy and even coat applied without runs.
Again.....watch temperature and
humidity levels, work indoors and try to keep bugs to a minimal. I have
no suggestions for bugs other than if you have the luxury of time, coat
before they arrive in the spring or after the first hard freeze. If they
are just 'build-up' coats, don't sweat it, as you cn sand them out before
the next coat. For final coat, if you are polishing your coating, no problem,
but watch your coatings flash and have a fine, needle-nose, or hemostats,
ready to pluck them from your wet surface. I also found that having screens
in your garage windows work. Try to keep as much fresh air coming in as
possible for the finisher.
Air dry at least 24 hours. If you
had any runs, use a razorblade to scrape then out. Then, sand with 320
grit and a block for those areas. Now go over the entire coated area. I
sanded this step with my electrical, random orbit, palm sander. I've had
this Porter Cable sander for 20 years now and it is the only time I have
found a good use for this sander. It does a fast, near perfect sanding
job with these "varnishes".
"Automotive-type" coatings, follow
product data sheets directions. You will need to ask for these when you
buy the coating. They are usually not labeled on the can. Generally, you
will apply 3-4 coats total. Most people just keep putting on coats until
they are just about out of coating.
how many coats do you
want to apply?
Well, most of us would prefer just one
but we're talking wood finishing here.......so.....If you were thorough
with your samples you will have figured this out. I went with 9 coats
of "varnish" before I thought I had enough varnish applied. Most "varnishes"
are about 25-30% solids. That means you will apply about 6 mils of wet
varnish per coat. After the solvents evaporate, this will leave a 1.5 mil
thick dry film. After sanding, you will have about 1 mil of dry
film left. Multiply this dry film by 9 coats and this will give you a 9
mils total of dry film. This is a sufficient base for which
to sand and polish out. Also, this film thickness allows for 1 additional
refinishing jobs before reaching that 20 mil film limit for varnish. This
will also make a good sanding base for those refinishing jobs years down
the road. If you do not polish, this will give you a nice, deep look. By-the-way,
most "automotive type" total dry film thickness is 6-7 mils thick and a
typical "automotive coating" can have 2 additional paint jobs done before
the whole thing will need to be stripped completely. But remember, I would
not recommend this film thickness for wood. Also, I used almost 2 gallons
of "varnish" to complete my 19' 7-litre hull.
"Automotive-type" coatings (because
of their higher solid content) generally need only 3 or 4 total coats and
can be sprayed right on top of the next coating, as soon as the previous
coating is dry-to-touch. The big plus here is you are done in 1 day.
If you are handy with a spray gun,
I would highly recommend you spraying the varnish for the last coat. This
will give you the best look and make for a easier polishing job if going
that route.
spraying the last coat
with "varnish"
If you decide to go this route for the
last coat, here's some tips for you. I recommend this, but you'll have
to decide for yourself if you want to do this. Spraying a coating will
always leave the best finish, bar none, to any coating application using
liquids. But some skill is involved with handling a spray gun. You need
nice, even, consistent movements. Runs, dry-spots, inconsistent and
an uneven coating will be your worse finishing nightmare. If you have even the slightest
doubt with working a spray gun, I wouldn't advise spraying any type of
coating. If you're confident, but don't have much experience with spraying,
again make samples, something 3-D, if you're happy with the result, go
for the hull. It helps to think and move like a robot.
My favorite spray gun for applying
the heavier viscosity type coatings were the old Devilbiss MBC spray guns.
These babies could atomize most coatings into very fine particles
for the perfect finish. They have not been around for a long time. But
the standard automotive refinishing spray gun handles the varnish very
well. The spray gun I predominately used was the Devilbiss #JGA-502-30EX (30EX being the cap and needle size),
which handles reduced varnish just fine. This gun has been a standard in
the automotive refinishing industry for quite a while, until the new technology came along. The JGA was a "conventional"
spray gun that produces good atomization, but transfer efficiency is not
very good. HVLP (high volume, low pressure) spray guns would probably work
if you have one and can get alot of product through the gun with some very
large tips. I personally don't care for them for small batches and staining
work, (mostly because I don't like the atomization of the finishing material)
but they are standard issue in California because of the state-mandated,
transfer efficiency ratings these spray guns produce. We use HVLP in our
high volume (topcoating) area in the finishing room. They use high amounts
of air at very low pressures to atomize the spray. This helps the spray
not "bounce" off the surface you are spraying. If I had this set up in
my tool box, I probably would have used it. If you have a spray gun in
your toolbox, try it on some samples and see if you get a smooth, heavy,
and even coat applied, which is the main objective here. No sense in buying
a new tool if you have one that will work. I get a kick out of seeing all
the ads for these fancy and outrageously priced spraying equipment setups
you see in the various do-it-yourself magazines. They also have these wild claims to 'em....Snake
oil...save your money if you don't own a spray gun yet. Just buy a standard
gun like above..about $200 bucks with a 1-quart spray cup (you'll spend
a little more with the stainless spray cup). It's very versatile and well
rounded for general spraying. The spray gun has all stainless passageways
throughout the gun. This will allow you to use it for water-based finishing
products and you won't have to worry about rusting anything. If you clean
them up right after each use, they will last you a lifetime. Adjust the
solvent reduction until you achieve the right "smoothness" to the coating.
Keep adding reducer just enough to spray a level coat and no more. Warm
the "varnish" if its cold out before spraying. (Careful, you're working
with big-time flammables here). A glue pot works best. It will help
lower the viscosity to a sprayable consistency without having to having
to reduce with too much solvent. Which with varnish, will be predominantly
mineral spirits. I also added in some naptha, which is a much faster evaporating
solvent than mineral spirits. (Old School was - 50% Naptha & 50% Mineral Spirits is
roughly what lighter fluid is). The key here, being to get a smooth, level,
and heavy coat applied, with no runs...that's the trick, isn't it!. If
you reduce (or thin) the coating too much, you will not get enough of a
dry film left on the surface to cover and fill in the 320 grit sanding
scratches and this is not good. Use a fine mesh strainer when pouring into
your spray cup. Double then up. Spray outside with just a light wind. Move
any vehicles, pets, and children. Varnish spray droplets are big, sticky,
gooey, blobs just waiting to ruin anything it lands on. If you don't like
your neighbors, this coat you are spraying will surely piss them off, so
plan accordingly. (That's why I live in the country).
Save your lungs and wear a cartridge-style,
organic respirator. Wear old long sleeves shirt, hat, and a pair of pants
you don't mind ruining. Or better yet, buy a cheap Tyvek suit for a few
bucks. Use disposable surgical gloves. I always have a box of these in
my garage....blue nitrale works good. If you wear glasses, they will be
'spotted' after you put this coat on. You will have a nice ring around
where your hull was in the driveway, so prepare for that unless your wife
doesn't care how that looks. You are going to probably be breaking a few
environmental and fire-safety laws, so you didn't read this here. PERFORM
this at your own risk!
Figure out which way the wind is
blowing and have it blowing on your back. Start spray direction close to
you moving right to left, back and forth, with moving the gun away and
spraying so all the overspray falls on the area that you are about to spray.
50% overlap each spray pass. Set your air pressure, at the gun, for about
50-65 pounds. "Varnish" typically likes to be sprayed at a higher air pressure
than alot of other types of coatings to get a good, even coat. Open up
the material control valve on the spray gun most or all the way and adjust
your fan width to give you a 8" width at about 8" away.cure
timeFor "varnish" I would wait at least
30 days before polishing. If you know you are going to polish, you can
sand after about 2 weeks and this will open up the pores in the coating
and promote a harder and faster cure. But still, let it sit for another
2 weeks.
If you used an "automotive-type"
coating, I would start sanding and polishing in about 14 days.
final
sanding before polishing
With "varnish", you should be able to
start with 800 grit if you sprayed the last coat. If you applied the last
coat with a foam brush, experiment with 400 or 600 grit to see if you need
to go this route. After 800 grit, I followed up with 1000, 1200, 1500,
2000 grit. Sand with rubbing block and a spray bottle full of warm water.
Keep the surface wet and do not push down on the block, let the
sandpaper do it's job. Human spit aids greatly in lubrication for this
step. My wife was laughing at me as I was spitting all over my hull, but
that's were the "spit-shine" term came from. Start a 2'x2' area. Get a
squeegee and use it to see what you are doing. Buy a large box of diapers.
The old style, 100% cotton, washable ones. These are getting harder to
find. Completely sand the
entire surface before moving on to the next grit. When you have completed
that grit size, on the next grit size up, you will want to sand in the
opposite direction. This method allows you to see easily that you have
removed the 'scratch' pattern from the previous sanding step. Keep the
surface clean, with these fine sandpaper sizes, you do not want to get
a chunk of anything that will gouge the surface.
On the 2000 grit, you can sand in
a circular motion with the sandpaper and sanding block. Keep the bottom
of your sandpaper clean. You can usually 'feel' if a bigger chunk of something
gets on the paper. Remove it immediately by getting fresh sandpaper.
With "automotive-type" wet sand
with 600 grit and then 1200 grit. You may need to finish up with 1500 grit
depending on the coating you used. To determine this, sand a small area
with 1500 grit and start polishing equally on both grit samples and see
if you need to sand with 1500 grit. If there's hardly any difference, you
can forego another round of sanding.
polishing
The buffer I use is a Milwaukee variable
speed 0-1750 rpm. I run it at full rpm. The guys at the shop use the Black
& Decker, because they make the lightest's polishers that we've been
able to try. I would not recommend a faster RPM for varnish. The bonnet
I have always used are called Round Up made by SCHELGEL. Part #890C.
This bonnet has a 1-1/2" pile. These are like the old lambs wool bonnets.
You will want the bonnet that is held on by a nut in the middle against
the hard rubber backer for the bonnet. Do not buy the tie-on ones that
have a string that attaches it to the pad. Any good automotive body supply
shop should carry these, they have been around for years. If not, the 3M
bonnets work okay. I would get two bonnets, one for the actual buffing
and one for cleaning up.
To get the feel of a buffer and
if you have never polished a coating out before, maybe try to use the foam
3M pads.....they were developed more for the 'rookies' at the body shops.
Their best feature is it makes it hard to "rub through" the coating. If
you're quick to learn and want the professional machine, use the bonnet
with the heavy pile and hard rubber backing pad. Just go easy near those
edges. Also, square inside corners are impossible to machine buff, so plan
accordingly. The polish I use is 3M FINESSE-IT II part #051131-05928. This
will be the only polish you should ever need. You will want to buff outside,
preferably on a somewhat windy day. You will have lots of lint flying around.
Work a 2' x2' area. No more, no less. Squirt a bead about 4" inches long
for that area. You usually need 2 applications of compound over a 2' x
2' area up to the gloss we all want to see. Clean up the bonnet often.
It should not be saturated (wet) or crusty (dry). To clean the bonnet,
hold the machine between your thighs and take a screwdriver and hold it
about 45 degrees to the pad. Power up the buffer at full speed and move
the screwdriver up and down. HOLD ON TO THAT SCREWDRIVER! They make a "spur"
for cleaning bonnets, but save your money. The screwdriver works just fine.
You will see the pad clean up as you move it back and forth. Get used to
cleaning your pad after every 3-5 applications of polishing compound. You
will see that cleaning the pad often will help you keep that pad nice and
fuzzy. Do not polish on the same spot very long. Keep moving the
buffer around left to right, then up and down. Use medium pressure when
you first start the buffing, then light pressure as the compound fades
away. Feel the surface right away. Is the surface too hot? It should be
slightly warm. That's it. Following these directions should bring the gloss
up, with a haze-free effect. If it's got a haze to it, you didn't recognize
that in your sample that you should had made to confirm you have a "buffable
varnish".
If it is an "automotive-type" coating
you are polishing, you will have no problems if the coating was properly
catalyzed, reduced, sprayed, cured and sanded properly. It will polish
out with ease compared to the "varnish" coating. With these catalyzed urethanes,
you can polish at a higher speed (up to 2600 rpm).
clean
up
Get some 3M Perfect-It Hand Glaze part
#05997 or 3M Imperial Hand Glaze part #05990 (available at the local auto
body supply shop) and using more of them diapers or sweatshirts. Apply
it like a wax. Wipe on, let it haze, and then wipe off with a clean cloth.
This will even out the polishing work and swirls and provide a protective
coating to your surface. Apply this material whenever detailing is needed.
It's good stuff.
That's it! If you took your time
and did everything yourself, you have learned a new trade, probably saved
yourself about $5000 bucks, and if you were thorough, should have the concours
quality wood boat finish. |