

Here is what it looked like the day I
brought in home in the fall of 1993.
If you look at the body from the seating
area forward, it is a 1926-27 Ford Model T.
The very next day......I started the tear
down.

This photo shows the 1925-26 Dodge part of
the body.
I like Hot Rods that do not have
fenders. So my plans are to get rid of them.
But this presents a problem because once
the home made fenders are removed,
the Dodge portion has a body shape around
the outside to accomodate their fenders.
Click
here
to see what I mean.

My daughter modeling.

Fast forward a few weeks. The car has
been disassembled. The body was removed from the frame for further modification. Here you can see where the Dodge section
has been divorced from the Ford Model T section. I will build a new rear
section and put the Dodge trunk lid back on. The original hotrodder welded
the doors shut and the door handles & cowling were filled. The body
was sectioned (cutting the bottom edge off about 6"). A piece of tubing
was welded in along the bottom edge to give it a finished look. All this
was filled in with lead and they did a really nice job.

I had a sheet metal company fabricate
a new rear piece from 16 gauge steel (Henry used 16 ga., too).
I fabricated
some sheet metal behind the seat to mate up with the rear trunk lid and
it was lots of fun to fabricate and weld. It's amazing how much sculpturing
you can do with the right hammer. In this photo you can see that I already
welded in the framing for the floor and firewall. The car originally had plywood used as a floor. I raised the floor up further to allow the body to
sit lower on the frame rails. After the floor framing is in place, I fabricated
a sheet metal tunnel to clear the transmission.

Almost there.
I extended the conduit along the bottom
edge. The Dodge trunk lid was fitted to the body (I had to build custom
hinges) and the firewall and windshield were also fitted to the body. Those
will be bolted on. After welding in the floor pan and test fitting the
body to the frame, it's off to the body shop. During the final body work,
everything will be smoothed out with a little fiberglass & filler.

I farmed out the majority of the the final
body shaping work to a good body man. He also layed down the primer and
paint.
The photo above was taken back in my shop
after I sprayed the final coats of paint and polishing. A small body like
this, sitting on a rollable workbench was a really nice way to go. There's
nothing better than being able to roll the whole shebang out into the driveway
for sanding & painting. As you can see, I decided to keep the yellow
for the color but picked a color that had a bit more warmth into it. The
acrylic enamel paint is Sherwin Williams. Their stock color name for this is called 'Sunburst
Yellow'.

After the frame was sandblasted, I beefed
up the original 1947 Ford frame with additional bracing before painting.
The rolling chasis is ready to receive
the body. As you can see, the gas tank and battery go under the rear trunk
lid.
No room for luggage here.

I started restoration in the fall of 1993.
In the spring of 1996, I took my first
drive in it looking all shiny & new and what a thrill it was!

Eight years later and still looking good
in the summer 2001.
In 2004, some 'issues' came up and upon
closer inspection, the 1970-74 302 cu in block was found to be cracked
between the cylinder walls. After some thought, I decided to replace the
old iron mill with a Ford crate 302 (1995-96). This roller motor was of
the part of the last of the 302s built at Ford's famous Cleveland engine
plant for sale to the general public. They were roller motors putting out
320 hp. This block came with GT40 aluminum heads. Since I was making the
motor swap, I figured it would be a good time to have the C-4 transmission
rebuilt and have the toque converter upgraded to a 2800 stall to help with
the extra ponies. Other new improvements included - new motor mounts configured,
a tunnel ram intake & dual carbs, MSD distributor & coil and electric
fan. I fixed the radiator again and lowered the shell to get a more streamline
look. Also added an electric fan. A nice touch I really liked was the new
Sanderson headers replacing the stock cast manifolds. Of course, with the
new headers, the entire exhaust had to be all redone.

Here it is in July 2005
wearing her old wheels in front
and back
Then we drove her for a few more years.
In the fall of 2008, I decided to fix a
small radiator leak that has been dripping on the garage floor for years.
While I was doing that I noticed my front leaf springs bushings were worn
out. I also noticed the front axle was bent........and well.....next thing
I know......I am in the middle on a complete rebuild on both front and
rear suspensions.
Below are photos showing those modifications.
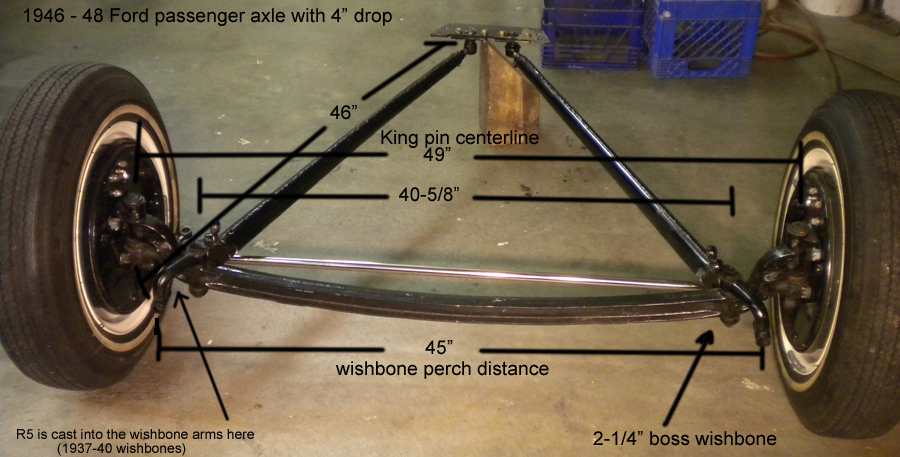
Above pic is the old suspension.
Everything is vintage 1947, except the
'37-'41 wishbones that had been split. The front axle was dropped and the
leaf spring was mounted in it's stock location in front of the axle. After
'discussions' with my son, the plan was to go to a 'spring-behind-the-axle'
setup. This would move the front wheels further ahead to give the car a
better look and lengthen the wheelbase. This should give it a better ride,
handling and a nice look. An easy way to do this would be to just ditch
everything and get a 1932 or so aftermarket axle and front suspension setup
along with a pair of hairpin radius rods. But that wasn't going towork
on this much wider 1947 Ford frame. When you turn the front wheels, it
would hit the radius rods (or 4 link if that was the case) and frame.
So, what were the other options?
I really like the look of Henry's wishbones,
so I thought let's take my usual route (the hard way) and just make whatever
I need by modifying the parts I already have. A few of the older hotrodders
I discussed this with thought I was nuts. But everyone agreed, if it could
be done, it would be rather cool. I like to think of it as a fat-stanced.
spring-behind axle setup.

The axle was bent so it was shipped to
Sid's Axles in Okahoma to be straightened.
I also had them mill a bunch of holes
in it.
The spring perches at the front of the
wishbones have been cut off and a new spring is relocated behid the axle.
This will push the the axle further ahead.
Above, I am positioning the leaf spring perches.

More work fitting the wishbones and front
suspension.
Since the axle was being moved forward,
I needed to extend the 'bones' to keep my mounting location in the same
spot it was before, which is on the frame's X crossmember. This photo also
shows you why alot of folks split the wishbones. Alot more room to put
stuff & one can now you can access the transmission pan and other parts.
Steering arm & drag link is remade to reach.

Since we're talking about wishbones - my
good buddy Jim, machined in the "Lightning" holes and fitted the tubes.
Ironically, the tube blanks were borrowed
from the scrap bin at the Ford plant in St. Paul, MN.
As you can see, the photo was taken after
I finished welding the tubes in 'em.

Here they are after grinding them down.
They came out pretty nice, eh?

Fitting the spring perches.
I left the '32 perch mounts long so I
could lower the weight of the car down on the spring pak and make adjustments.
I went through 2 different leaf spring
paks from Posies Springs before finding the right one.

With the leaf springs now in place, I
am trying to figure out where to place the shocks.
The passenger side shows where the shocks
were mounted before using the mid-1950s F-100 mounts.
I went with the location you see
on the driver's side.
Oh, this photo show's the new front crossmember
I bought from Speedway Motors which allowed the car to sit 3" lower.
I'm trying to get the whole setup lowered, but I can only lower the car so far
before I have an issue with the frame
bottoming out on the axle.

I just love the look of the Buick finned
aluminum brake drums,
the 1949 Lincoln backer plates & air
scoops. Inside the drums are brakes from a F-150.

In case you were wondering, 1940-48 Ford spindles will attach to early 1960s Buick drums.
Above pic is after I seperated the spindles from the Ford drums and they are shown laying on top of the Buick drums.

The OLD rear end setup.
Dana 44 axle (one wheel wonder) with 3.31
gears.
I eventually had put in some air shocks I had sitting around to
lift up the old sagging leaf spring.
The undersized ladder bars and how they
were attached to the axle was sketchy at best.
Time to get rid of all this.

The NEW rear end setup.
This photo was taken during final mockup
on the rear suspension. The axle is a Ford 9" rear end from a 1986 Bronco
(which was the last year of production for the famous 9"). Only the driver's
side of the housing had to be shortened a few inches to center the pinion
in this car. By having to only narrow that side down, a few bucks were
saved. Axles are stock 31 spline. Yukon 3.89 gears (from my Fairlane) along
with a Richmond LockRight complete the axle setup. The upper stock shock
mounts on the modified & lowered stock rear crossmember is plenty strong
enough and in a good place for installing the QA1 adjustable shocks &
Afco coil springs. The new ladder bars were fabricated by Jim Kilpatrick
and I positioned those in a triangulated setup. This will alleviate some
of the stress on the frame when turning and going over uneven surfaces.
A pair of Competition Engineering reinforced 360° axle brackets were
fitted & welded around the housing to hold the axle in place. Horton
panhard bar keeps the entire system centered under the car.

A good sight. Everything back from the
powdercoater.
This means most of the the fitting and
grinding and welding is out of the way and parts can go back in for good.
While I was waiting for the parts to come back from the powdercoater, I
masked off the entire car and engine and repainted the frame after all
the changes. I bolted everything back together, fired it up and drove it.
Yessir.....everything was SOOOO much better. I spent a few days tweaking
stuff around. Things like dialing the coilovers in (after buying a lighter
set a coilover springs), extending and reshaping the brake pedal arm &
adjusting brake shoes & proportioning valve on the brake system and
now have the car driving & stopping pretty damn good. I was going to
weld up my own exhaust system, but decided...no lift, screw that...and drove it
up to the Trucks N' Toys and had them fabricate a 2.5" mandrel bent exhaust
system with new mufflers. Sounds so sweet!
We drove the car for the last
couple of months of summer in 2010.

It's now fall and I decided, what the
hell, let's get rid of that VERY uncomfortable bench seat and get a couple
of bucket seats back in and LOSE the off-white upholstery material. Way
toooo much work trying to keep a white interior clean. And since I'm at
it, after 17 years of no music in the car, I decided it was time to put
some music back in this lil' ole hot rod. I always said..."REAL hot rods
have no doors". Now even though I like to say that, in this picture - I
sure was thinking it would be NICE if I did have some doors when I need
to work under the dashboard.


I
kept denting the cheap speaker gills, so time to get rid of them and tweak
the interior by recessing the speakers in further and putting some ss wire
mesh as grill covers. This look also ties in with the new grill going in
the Model T grill shell I am going to install. The wood dash was showing
it age, so time to replace that with a stainless steel piece I had laying
around. My buddy Jim, engined-turned the plate after I cut & shaped it
and I bought a aluminum gauge cluster to hold the gauges. Then topped it
all off with a Grant steering wheel that's been sitting around my garage
for years. I also put in a bigger alternator & rewired the car.

The 1958 GM truck radiator finally dies (tanks and core coming apart). I'm going to put in a aluminum radiator
and time for the Model A grill shell to be replaced with a Model T grill shell.
Of course, the Model T grill shell aren't tall enough, so time to start fabricating to make it taller.

Fitting in the alum radiator. I fabbed up a few brackets and moved the radiator support rods to a tranglular shape.

Model T grill shell is sandblasted & sanded and ready to have the extension pieces fabbed up to
make it taller and brackets fabbed inside to mount a stainless grill.

After fabricating and adding in the extensions pieces to make the shell tall enough,
I found some embossed 2" steel banding online and made the grill shell wide enough
to cover the radiator and fan shroud.

I spent a few hours (like most the winter) fabbing / fitting / welding this Model T shell.
I made the brackets that attach the radiator and hold the shell on the same as the Model A chromed grill
shell, so if the spirit moves me, I can easily switch between grill shells.
Thanks for visiting and hope you enjoyed my restoration page.
Click to View
the Build Sheet
Click to go back and View
how it looks today
©2001-2020 Phil
Spruit |